Designed to simplify managing warranties within the Repair Order (RO), this feature allows you to easily create, track, and manage warranty jobs for parts and labor directly within the job history. It ensures that warranty-related tasks are handled efficiently, with clear labels and icons to help users navigate through the process.
Starting a Warranty Job
To start a warranty job, you’ll first want to CREATE A NEW REPAIR ORDER.
Once created navigate to the Job History section, which is accessible via the Estimate or Summary tabs.
NOTE: The original RO does not need to be unposted, please continue with the creation of the new repair order.
Here's how it works:
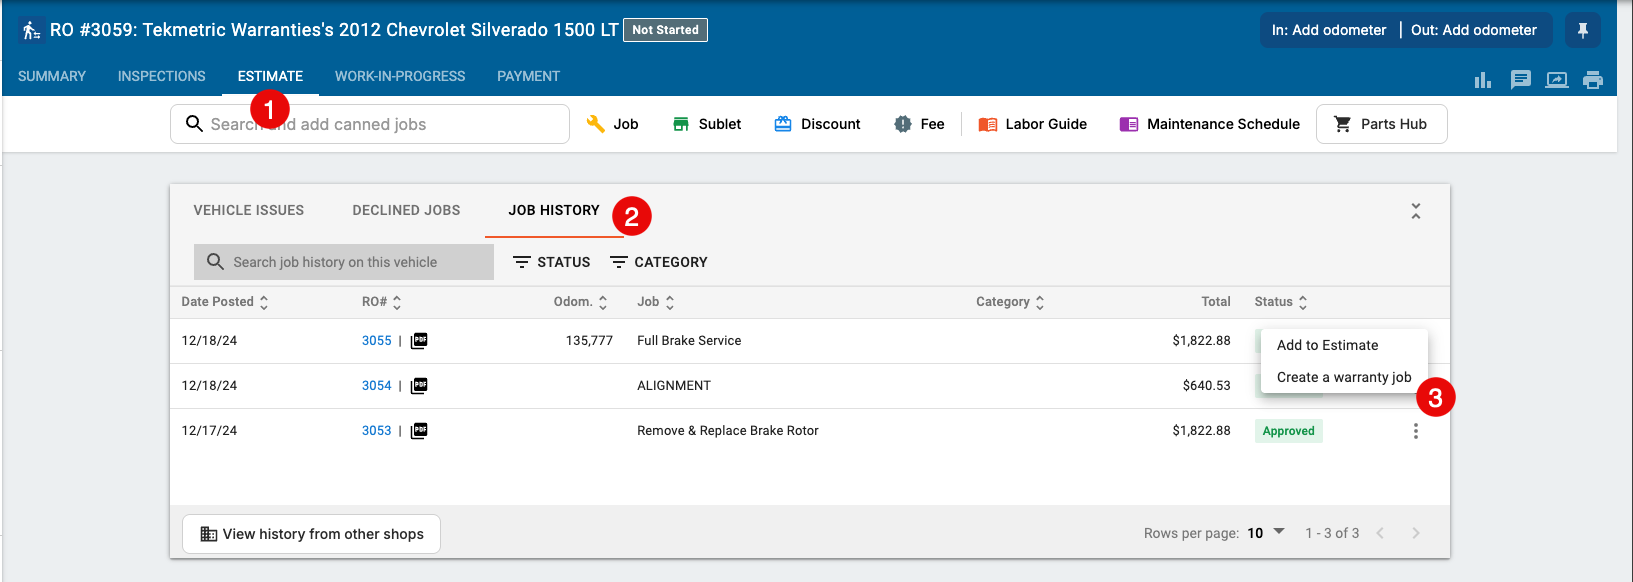
- Locate the job in the Job History table that needs warranty coverage
- Click on the three-dot menu next to the job
- From the drop-down menu, select Create a warranty job. This will open the area where you can choose the specific parts and labor to cover under warranty
This process ensures that you can easily identify and manage warranty claims right from the job history, making the workflow more intuitive and streamlined.
Creating a Warranty Job
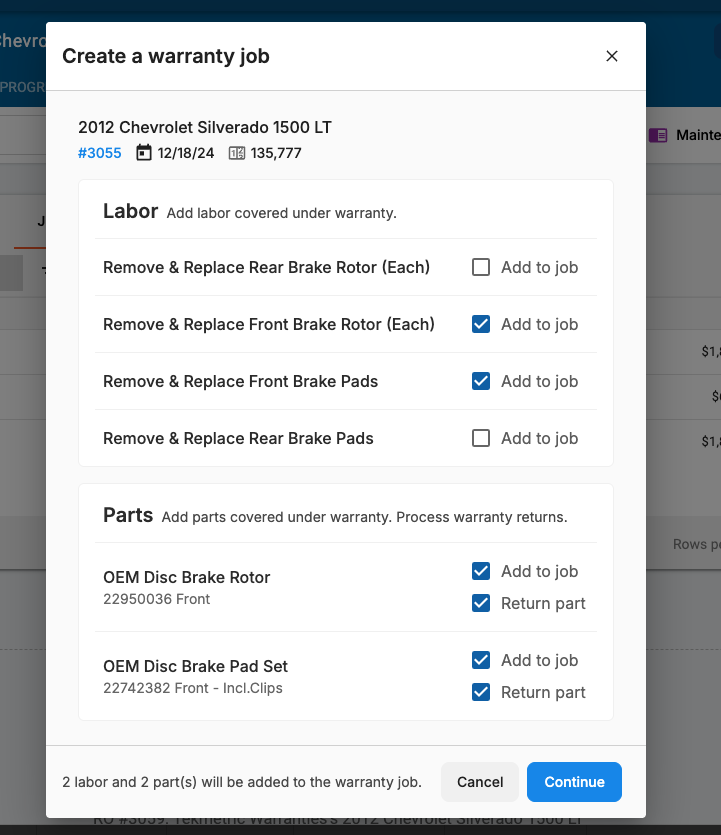
Once you've initiated a warranty job from the Job History, the next step is to select the parts and labor that need to be covered under the warranty.
-
Entire Job or Partial Coverage: You can choose to cover the entire job or select only specific parts and labor items. This offers flexibility depending on the situation.
-
Checkboxes for Selection: Each part and labor item will have a checkbox next to it. Simply check the boxes for the items that you want to cover under warranty. These selected items will be automatically added to the warranty job.
This selection process is crucial because it influences the visualization of the parts and labor on the original repair order, the new repair order, and part reporting. It ensures that only the relevant items are covered under the warranty, making the management of warranty claims precise and effective.
Warranty Part Returns
If any parts are selected for return, you will be asked to enter the return quantity.
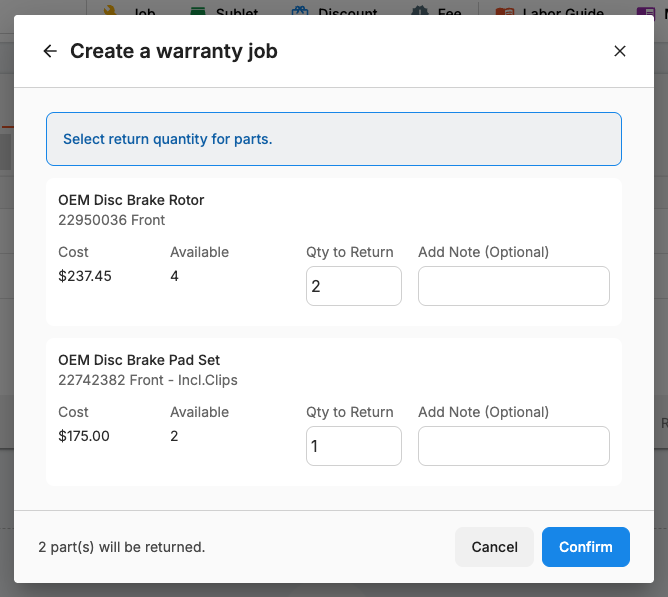
You will see detailed information about each part, including:
-
-
Cost per Unit: Based on the PO.
-
Quantity Available: This is calculated as the quantity on the PO minus any previous returns.
-
Quantity to Return: Set to 0 by default; you need to specify the number of units to return.
-
Add Note: You can also add a note that will be recorded in the return order.
Once you confirm the return, a warranty part return order is created, and the parts are moved into the 'parts to return' section.
The system’s automatic handling of PO availability and quantity ensures that the process is smooth, reducing the likelihood of errors and simplifying the workflow for users.
Current Job
When a warranty job is created, the job title will be formatted as [Warranty] + [Job Title] . The previously selected items will be automatically added to the warranty job.
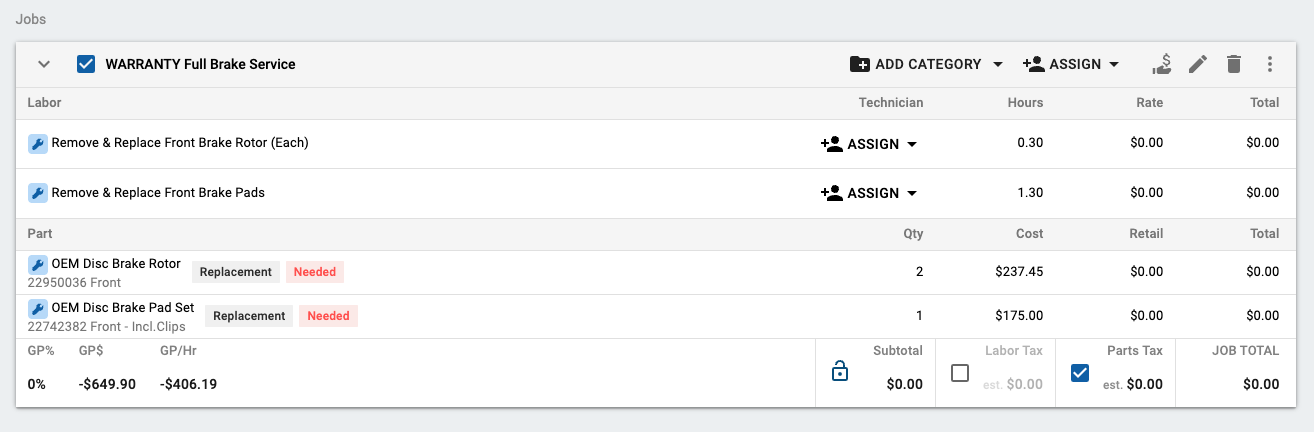
The following elements from the Source RO will not be copied to the current RO:
- Technician Assignment
- Job Category
- Part Markups
- Part Matrices
- Discounts
All financial fields for parts and labor will be set to $0.00 by default (note: These values are editable if necessary). These fields include:
- Labor Rate
- Labor Total
- Part Retail
- Part Total
Original Job
When creating warranty jobs, specific labels are applied to parts on the original job to indicate their status: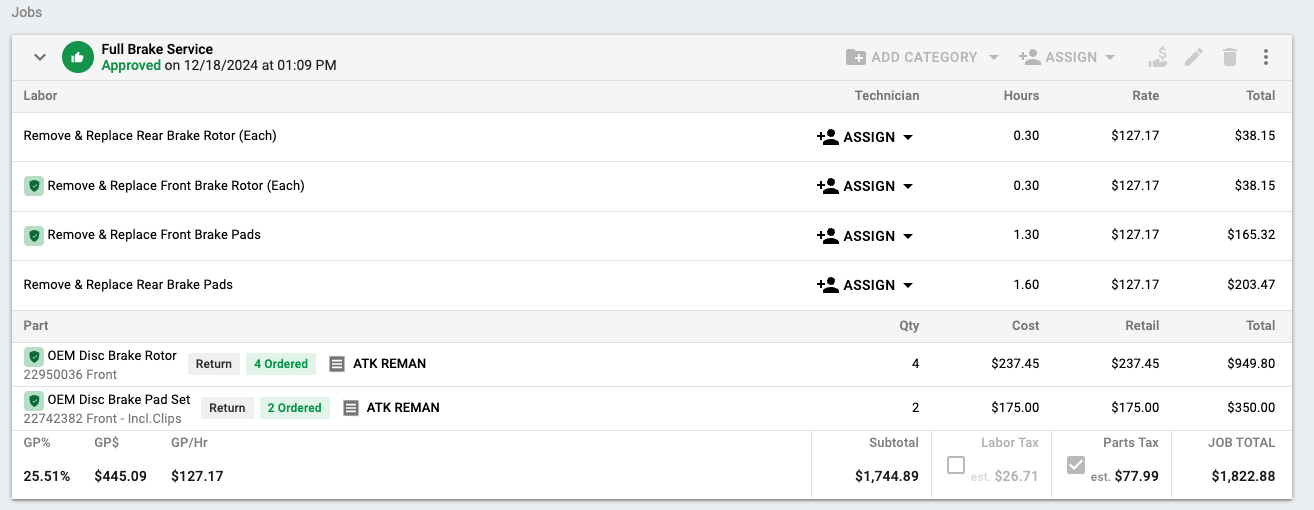
-
Return Label
-
Description: This label is shown when a part has been selected in the warranty modal and the user has initiated a warranty part return.
-
Behavior: If a part return is moved back to the Repair Order (RO) and the quantity in returns equals the quantity moved back to the RO, the label will update from "Return" to "No Return."
-
No Return Label
-
Description: This label is displayed when a part has been selected in the warranty modal but the user has chosen to skip the warranty part return. It is also used for parts where a purchase order was not detected, such as for inventory parts.
Part Usage Report
Each warranty-associated part will have specific labels indicating its status. These labels help you quickly identify how warranty parts are managed and whether they were returned or if they are replacement parts.
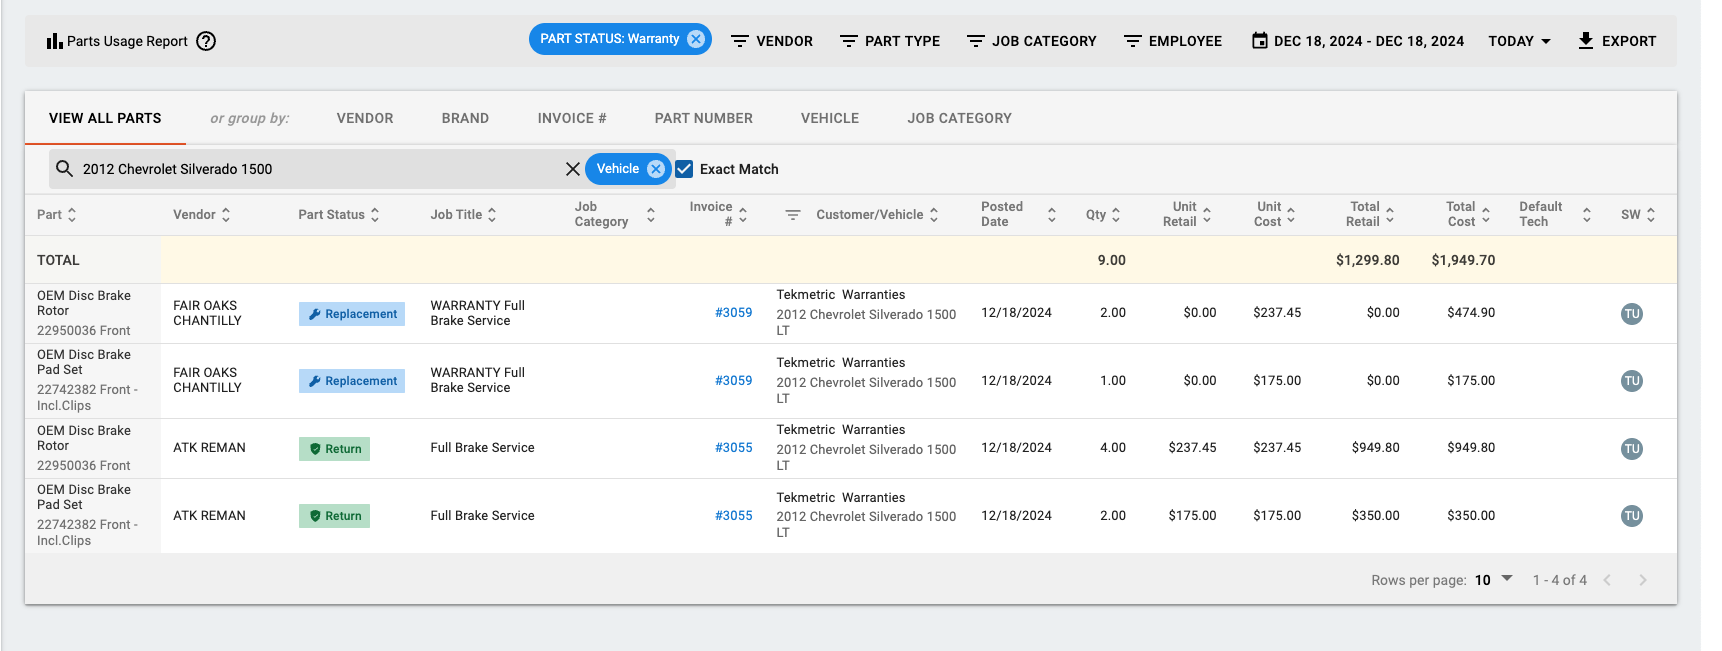
Part Status Filter: When you apply the Part Status filter to show "Warranty," the report will display parts associated with three specific types of warranty parts:
-
"Return": Applied to parts marked for return.
-
"No Return": Applied to parts where a return was skipped or not detected.
-
"Replacement": Applied to parts added to the current job as replacements.
Part Purchased Report
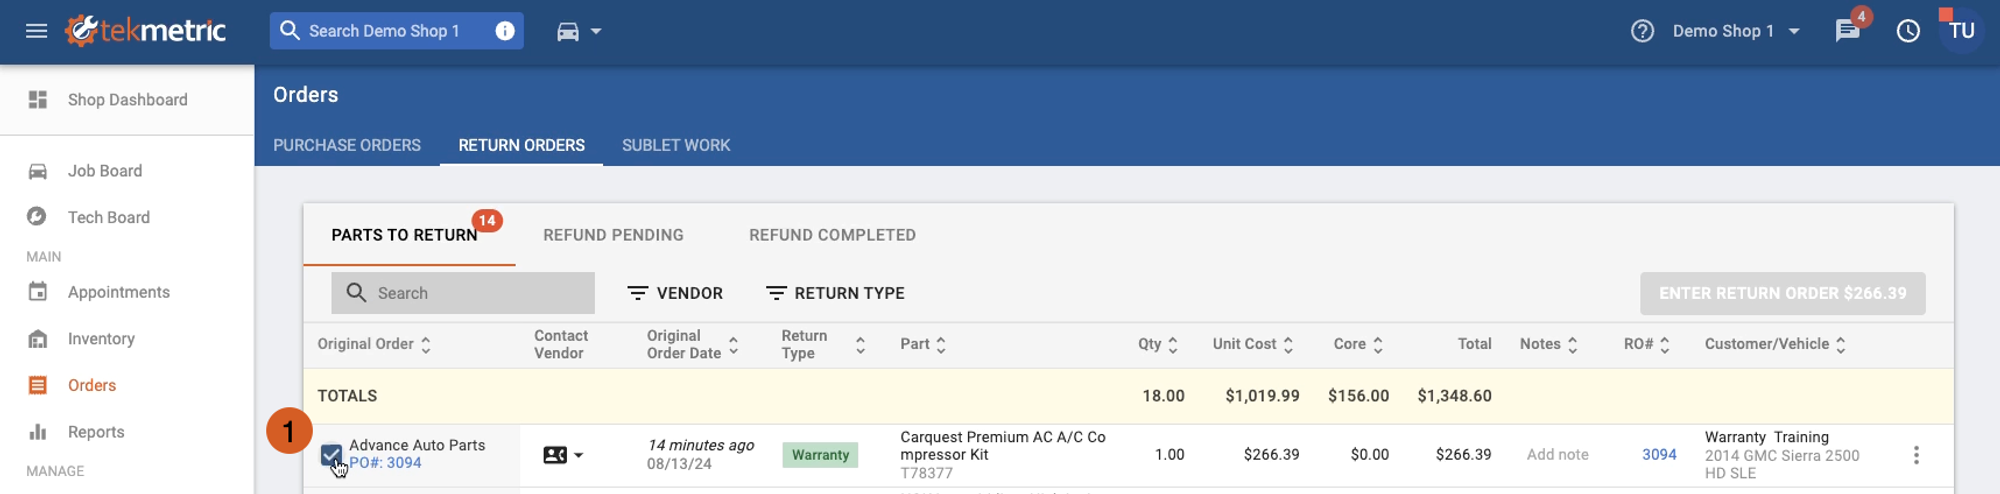
Warranty returns will be visually distinct from normal parts, return orders, and cores within the Part Purchased report. This helps you quickly identify these items and understand their impact on the overall financials.
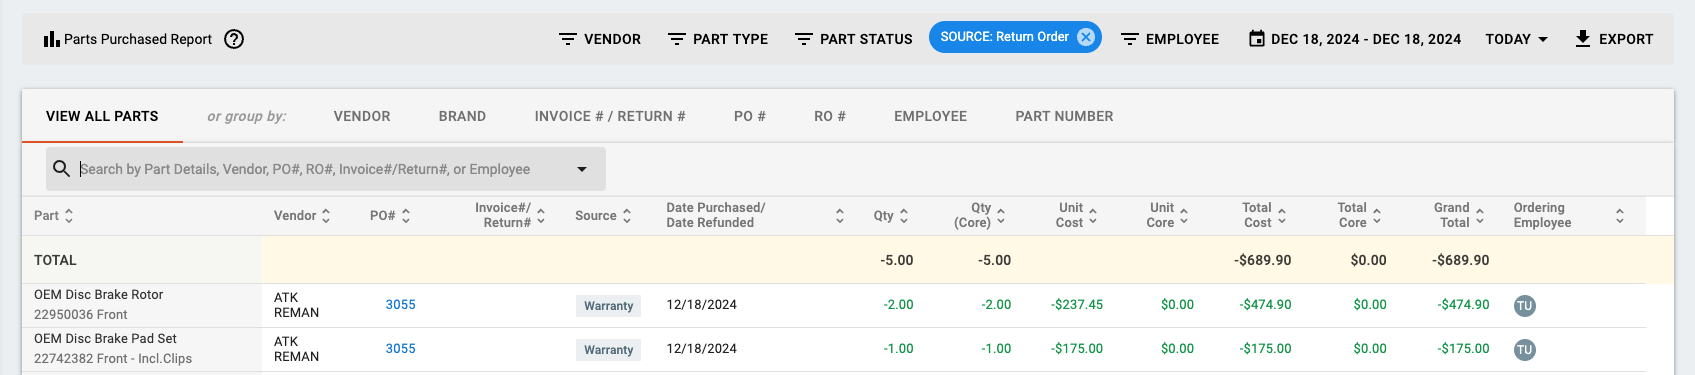
- The Source column plays a crucial role in identifying the origin of each part. When dealing with warranty parts, the Source column will include a "Warranty" label. This label distinguishes parts that have been returned under warranty. Once a refund process is finalized and marked as "Refund Complete" the corresponding part line will reflect the "Warranty" status.
- When you apply the Source filter to show "Return Orders," the report will display parts associated with three specific types of return transactions
-
- Warranty
- Return Order
- Core Return
- Parts labeled with "Warranty" in the Source column are associated with negative values for quantities, costs, and totals. This reflects the credit received from the return, reducing the overall cost in the report. For example, a part that was returned under warranty will have its cost and quantity displayed as negative, indicating the financial credit.
FAQs / Videos
Q: How do I start a warranty job?
A: Watch Video
Q: How can I replace or upgrade a part?
A: Watch Video
Q: How do I make sure my job profit is accurate?
A: Watch Video
Q: How do I warranty parts/labor for the second time?
A: If the replacement part fails, locate the WARRANTY job in the job history and select “Add as Warranty.” However, if another of the original parts fails, be sure to find the original job and start the warranty process there.
Q: What reporting is available for warranties?
A: Warranty returns will be visually distinct from normal parts, return orders, and cores within the Part Purchased report. Additionally, in the Part Usage report, each part that has been associated with a warranty will have specific labels to indicate its current status.
Q: What does the ‘Replacement’ label represent?
A: This label is displayed for the part that has been selected by the user and copied to the current job
Q: What does the ‘No Return’ label represent?
A: This label is displayed when a part has been selected in the warranty modal but the user has chosen to skip the warranty part return. It is also used for parts where a purchase order was not detected, such as for inventory parts.
Q: What does the ‘Return’ label represent?
A: This label is shown when a part has been selected in the warranty modal and the user has initiated a warranty part return.
Q: Can I reassign parts and labor covered under warranty?
A: No, if a part or labor item is covered under warranty, the system prevents users from moving that item between jobs. The "Covered Under Warranty" icon is displayed next to the part name, and the Job Assignment drop-down is disabled.