In Tekmetric you can manage and setup custom payment methods to apply when taking payments within a repair order. The options created here will be available in a drop-down menu when you select Other on the Payment tab of an RO. In the article, we will review the following:
Setup Custom Payment Methods
- Click the Shop Settings section on the bottom of the left menu bar.
- Click the 2nd tab, RO Settings.
- RO Settings table - This table is where you setup most information regarding your repair order and estimates. It is where you set up your labor rates, shop fees, discounts, taxes, job categories, other payments, and advanced settings.
-
Click Payment Settings to set up the custom payment options.
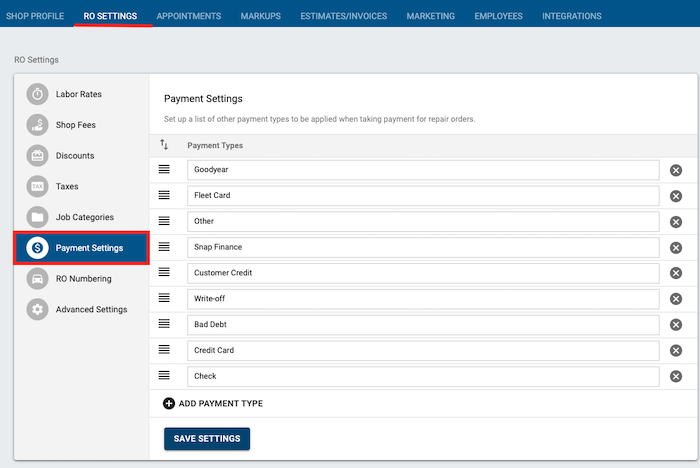
Add a Custom Payment method
- Click Add Payment Type button to add a custom payment type.
- Type out the new payment method you'd like to add.
-
Click the blue Save Settings button.

Remove a Custom Payment Type
- Click on the X icon to the right of the Payment Type row to remove a method of payment.
- Click Save Settings button to save changes made.
Reorder Custom Payment Types
- Click on the drag & drop icon (3 horizontal lines) to drag up or down a Payment Type.
- Click Save Settings button to save changes made.
Note: The order you have the payment types in your settings is the order it'll show in the drop down menu within the RO.

Important Note: Custom Payments vs. Integrated Financing
Please note that Custom Payment Types are manually defined by your shop (e.g., Fleet Cards, Check, or specific local accounts) and do not facilitate electronic transactions.
These are distinct from Tekmetric Payments integrated financing options, such as Sunbit or Klarna. Access to and configuration of those integrated financing tools are managed separately. Selecting a "Custom Payment" only records the payment type for your records and will not trigger an application or digital transaction through a financing partner.