If you're having trouble with your DYMO LabelWriter printer and Tekmetric oil change stickers, don't worry—there are a few key settings to adjust to get everything printing correctly. This guide will walk you through setting up your printer and configuring the settings to ensure a smooth printing process.
Printer Installation and Setup
1. Install DYMO Connect Software: To ensure all necessary printer drivers are installed, download and install the DYMO Connect software on each PC that will be used for printing. You can find the software on the DYMO website.
2. Add a Printer: Go to the Windows search bar, type "Printers," and select Printers & Scanners. Click the Add device button. Since the printer may not be automatically detected, select Add manually when prompted.
3. Use an IP Address: In the new window, select the option to Add a printer using an IP address or hostname and click Next.
4. Enter IP Address: Set the Device type to Autodetect. If you have a print server, enter the IP address of that server in the Hostname or IP address field. The Port name will fill in automatically. Click Next.
5. Select the Printer Driver: In the "Install the printer driver" window, select DYMO from the Manufacturer list. Then, from the Printers list, select your specific model, such as DYMO LabelWriter 450.
Do not select "DYMO LabelMANAGER 450" as it will not work. Click Next.
6. Name and Share the Printer: You can rename the printer or leave the default name. On the Printer Sharing screen, keep the default settings, ensuring the share name is consistent across all computers. Click Next and then Finish. Your printer should now be listed in the Printers & Scanners menu
Printer Properties and Settings
1. Access Printer Properties: Return to the Printers & Scanners system settings page. Select your DYMO printer from the list and click on it.
2. Choose Printer properties from the options.
3. Adjust Preferences: In the Properties window, click the Preferences... button under the General tab.
4. Open Advanced Options: In the new window, select Advanced.
Configure Settings: In the "Advanced Options" window, adjust the following settings:
- Paper Size: Select a paper size that is close to your sticker dimensions. For stickers that are 1.75" x 2.5", the "30258 Diskette" option is recommended.
- Print Quality: Set this to 300 x 300 dots per inch.
- Print Quality (under Printer Features): Set this to Text Only.
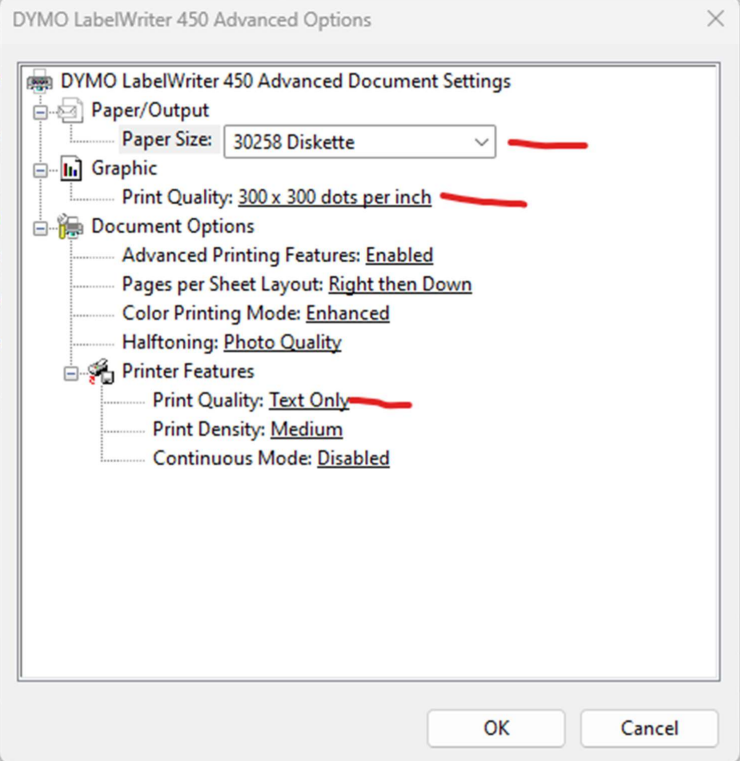
Click OK to save the changes.
Printing the Sticker from Tekmetric
1. Open Tekmetric: In an open Repair Order (RO) in Tekmetric, click the printer icon.
2. Print Oil Sticker: Select Print Oil Sticker. Here, you can make minor adjustments to the sticker's height and width.
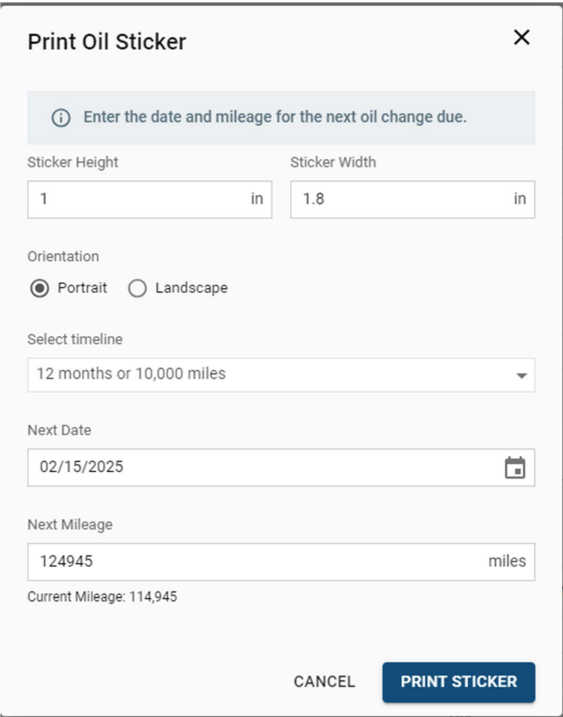
Click Print Sticker.
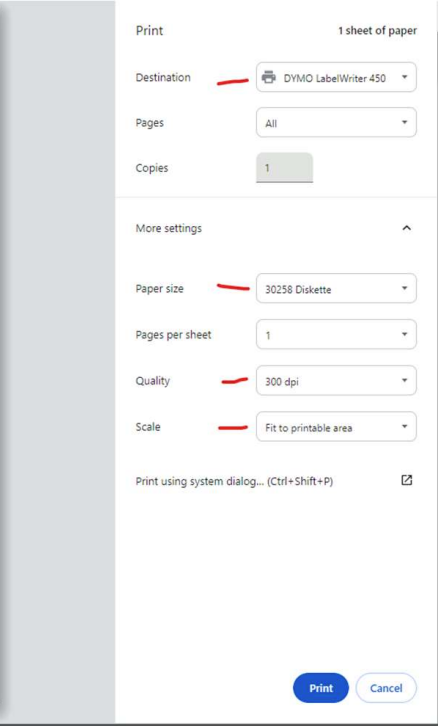
Verify Print Preview: A web browser print preview page will open. Click the printer icon again.
Confirm Final Settings: Before printing, confirm that the correct printer is selected and the settings match what you configured earlier, including:
- Paper size: Matches the one you chose in printer properties.
- Quality: Set to 300 dpi.
- Scale: Set to Fit to printable area.
- Print: Click Print.
Since achieving the perfect alignment can be a matter of trial and error, the most significant change you can make is ensuring the correct paper size is selected in the printer settings, as this will have the biggest impact on the outcome.