If you're having trouble with your DYMO LabelWriter printer and Tekmetric oil change stickers, don't worry—there are a few key settings to adjust to get everything printing correctly. This guide will walk you through setting up your printer and configuring the settings to ensure a smooth printing process.
Printer Installation & Setup
- To ensure all necessary printer drivers are installed, download and install the DYMO Connect software on each computer that will be used for printing. You can find the software on the DYMO website.
-
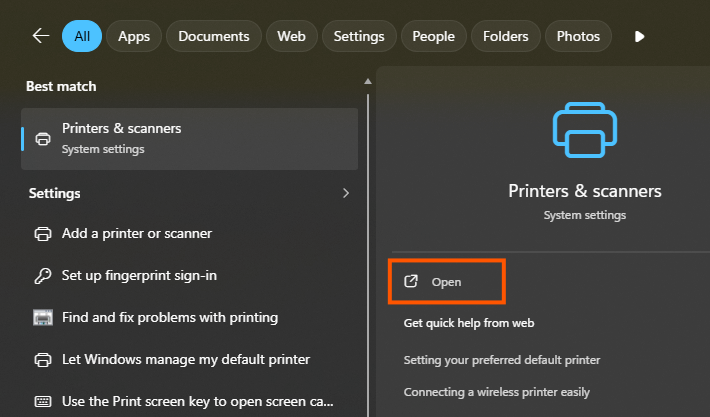
Go to the Windows search bar, type "Printers," and select Printers & Scanners.
-
Click the Add device button. Since the printer may not be automatically detected, select Add manually when prompted.
-
In the new window, select the option to Add a printer using an IP address or hostname and click Next.
-
Set the Device type to Autodetect. If you have a print server, enter the IP address of that server in the Hostname or IP address field. The Port name will fill in automatically.
-
Click Next.
-
In the "Install the printer driver" window, select DYMO from the Manufacturer list.
-
Then, from the Printers list, select your specific model, such as "DYMO LabelWriter 450". NOTE: Do not select "DYMO LabelMANAGER 450" as it will not work.
-
Click Next.
-
On the Printer Sharing screen, keep the default settings, ensuring the share name is consistent across all computers. Click Next and then Finish. Your printer should now be listed in the Printers & Scanners menu.
Printer Properties and Settings
-
Return to the Printers & Scanners system settings page.
-
Select your DYMO printer from the list and click on it.
-
Choose Printer Properties from the options.
-
In the Properties window, click the Preferences... button under the General tab at the top.
-
In the new window, select Advanced.
-
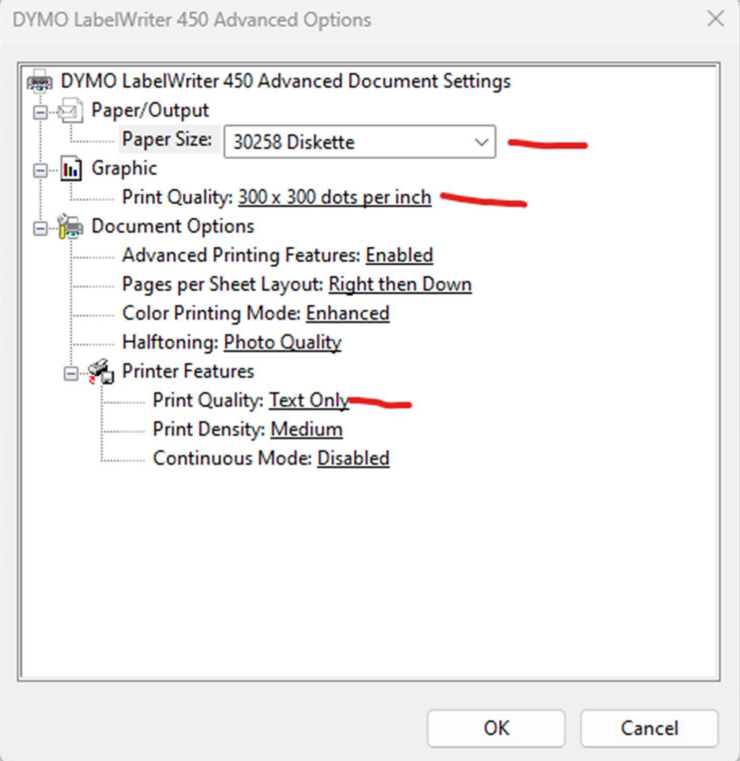
In the "Advanced Options" window, adjust the following settings:
-
Paper Size: Select a paper size that is close to your sticker dimensions. For stickers that are 1.75" x 2.5", the "30258 Diskette" option is recommended.
-
Print Quality: Set this to 300 x 300 dots per inch.
-
Print Quality (under Printer Features): Set this to Text Only.
-
Click OK to save the changes.
Printing the Sticker from Tekmetric
- Once hardware settings have been changed, navigate to an open Repair Order in Tekmetric.
-
You'll need to make sure the initial (In) mileage is entered on the Repair Order in the top-right corner first.
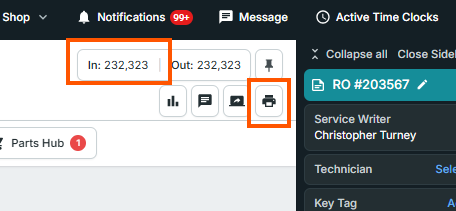
- Then click the printer icon button and choose Print Oil Sticker.
- Adjust the sticker height and width ratio. Start with the settings below and make small adjustments as necessary depending on your sticker size:
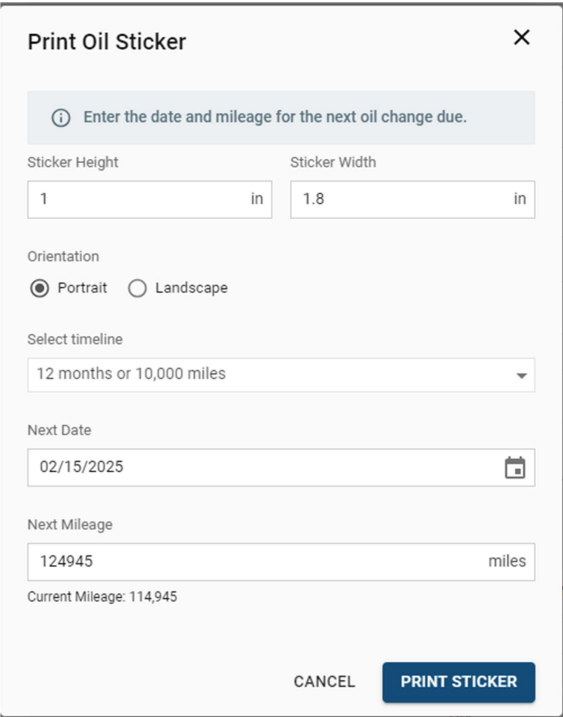
- Click the Print Sticker button.
-
A web browser print preview page will open. Click the printer icon again.
- Before printing, confirm that the correct printer is selected and the settings match what you configured earlier, including:
-
Paper size: Matches the one you chose in printer properties.
-
Quality: Set to 300 dpi.
-
Scale: Set to Fit to printable area.
-
Print: Click Print.
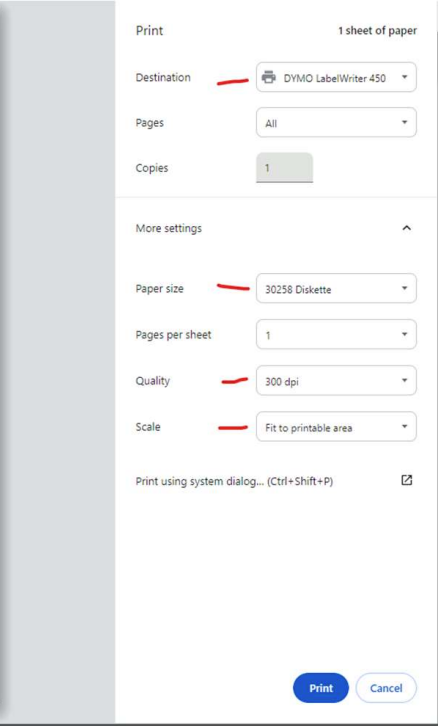
Since achieving the perfect alignment can be a matter of trial and error, the most significant change you can make is ensuring the correct paper size is selected in the printer settings, as this will have the biggest impact on the outcome.
Looking for an Alternative?
Option 1: Canned Job Automations
If your shop uses Tekmetric Marketing, you can skip the sticker and have Tekmetric remind customers automatically when their next oil change is due.
Canned Job Automations send customers a message at the time or mileage you choose. They support both mileage-based and time-based triggers. Instead of relying on a customer to notice a windshield sticker, look up your shop, and call to book, the reminder goes to them at the right moment.
- Set when reminders go out in your shop’s Automation settings.
- No sticker or printer setup is needed.
- Requires Tekmetric Marketing.
Option 2: Print Stickers with the My Oil Sticker Integration
My Oil Sticker is a third-party integration from Detect Dog that adds a print button to your Tekmetric repair orders. It prints custom-branded stickers with your logo, a next-service date and mileage, and a QR code that sends customers to your scheduling site. It uses its own dedicated sticker printer rather than a Godex.
View our My Oil Sticker Integration Guide.