To print lube stickers from your GODEX printer, you'll need to complete the following steps. Often, there is a bit of tweaking required depending on the exact printer and stickers your shop uses. We recommend starting and then making small adjustments until the ideal print result is found. This article will review the following:
Adjustments to Printer Hardware Settings
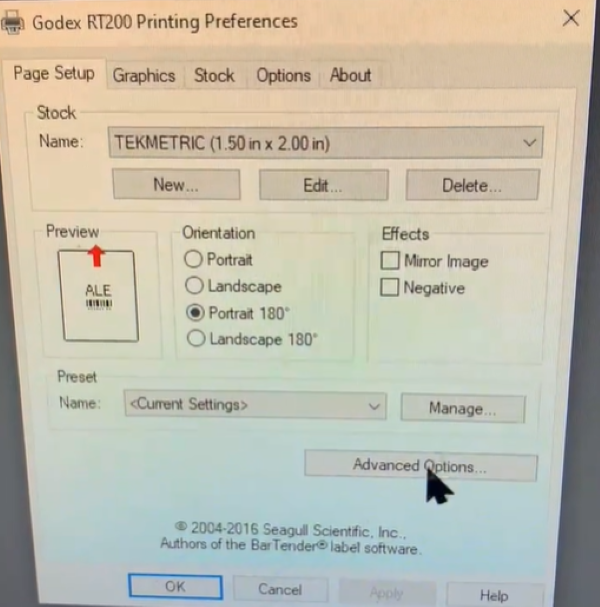
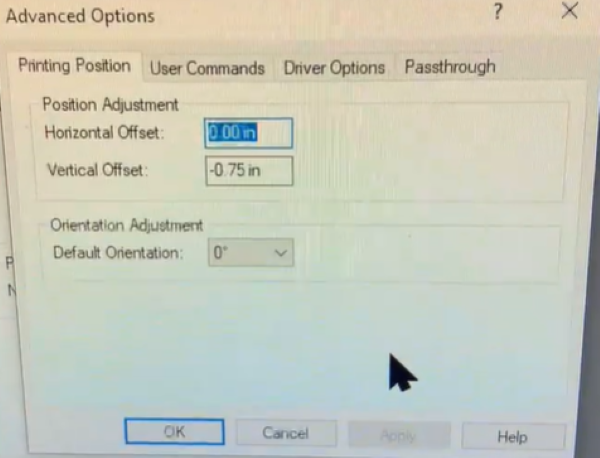
Open the printer hardware settings or preferences (This is outside of Tekmetric in your computer settings). Configure the settings to reflect the following:
- Name: Tekmetric (1.5in X 2.0in)
- Orientation: Portrait 180
- Horizontal Offset: 0.00in (located in Advanced Options)
- Vertical Offset -0.75in (located in Advanced Options)
Adjustments to Tekmetric Printing Settings
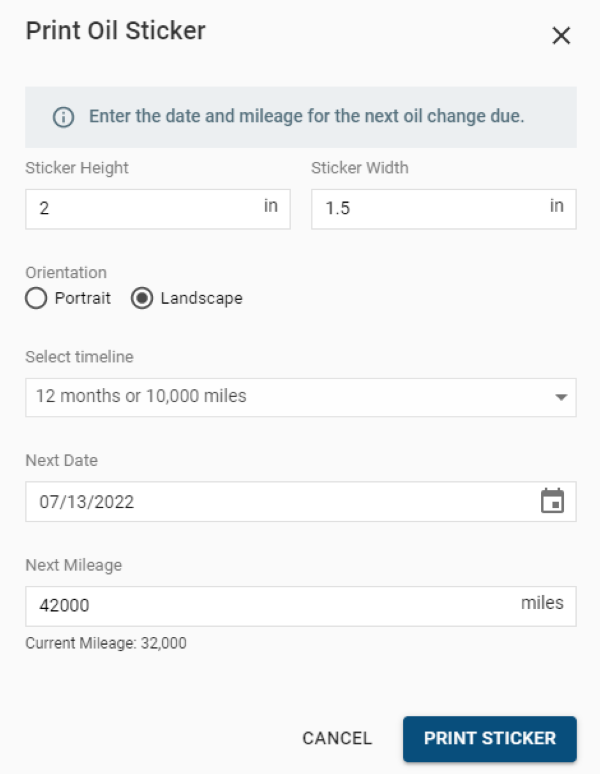
Once hardware settings have been changed, navigate to an open RO in Tekmetric. You'll need to make sure mileage is entered on the RO in the top right corner first. Then click the printer icon and choose Print Oil Sticker. Adjust the sticker height and width ratio. Start with the below settings and make small adjustments as necessary depending on your sticker size.
Printing the GODEX Sticker
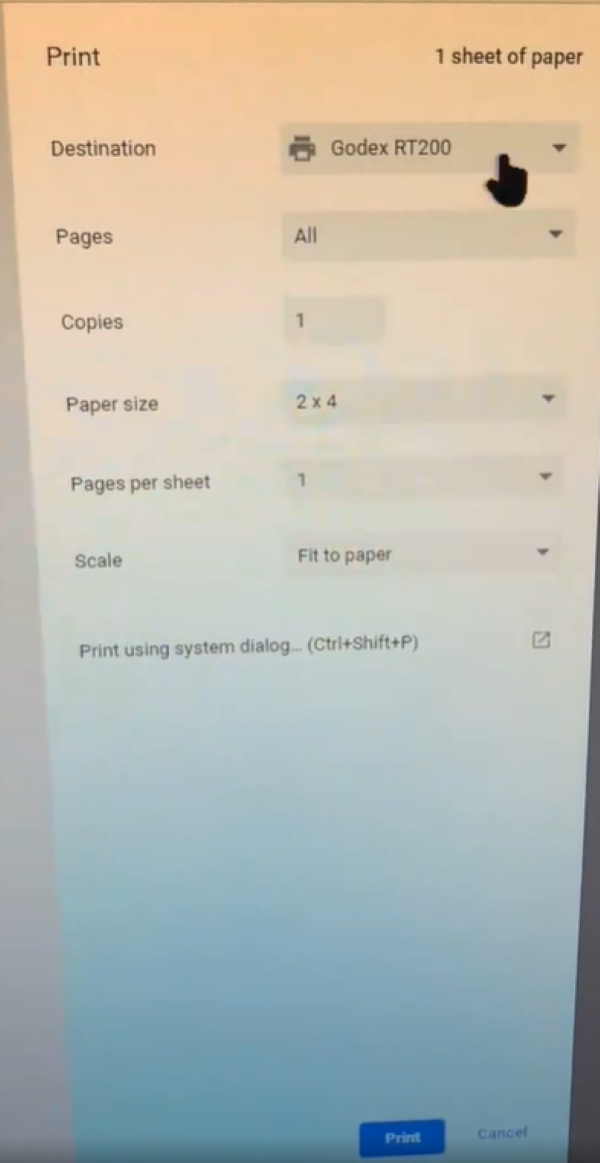
- Destination: GODEX RT200 (or other name for printer)
- Pages: All
- Copies: 1
- Paper size: 2 X 4
- Pages Per Sheet: 1
- Scale: Fit to paper
Godex Lube Sticker Printer Troubleshooting
Step 1: Check Your Computer's Printer Settings
Tekmetric sends print jobs to your computer's default printer, so it's critical that your Godex printer is correctly configured there.
-
Match Your Label Size:
-
On your computer, go to Devices & Printers or Printers & Scanners.
-
Right-click your Godex printer and open Printer Properties or Printing Preferences.
-
In the Page Setup or Paper tab, ensure the width and height match the exact dimensions of your physical lube stickers. (e.g., 2.0" x 1.5").
-
Set Orientation:
-
In the same preferences window, set the orientation to Landscape or Portrait 180 to ensure the text prints correctly on the label.
-
Calibrate for Media:
-
Turn your Godex printer OFF.
-
Press and hold the FEED button while you turn the printer back ON.
-
Continue to hold the FEED button until you hear a series of beeps, then release. The printer will feed a few labels to automatically calibrate to the correct size.
Step 2: Troubleshoot within Tekmetric
Once your computer's settings are correct, you need to ensure Tekmetric is sending the print job correctly.
Step 3: Handle Common Connectivity & Driver Issues
If the issue persists, it's likely a communication problem between your computer and the printer.
-
Clear the Print Queue:
-
Go to your computer's Printers & Scanners list, click on your Godex printer, and select "Open Queue."
-
Right-click any documents in the list and select Cancel to clear all pending print jobs. A stuck job can prevent any new prints from going through.
-
Restart Everything:
-
Turn off the printer, unplug it from the computer, and then restart your computer.
-
Once your computer is ready, plug the printer back in and turn it on.
-
Reinstall the Driver:
-
A corrupted or outdated driver can cause a range of issues.
-
Go to your computer's Printers & Scanners settings and remove the Godex printer.
-
Go to the official Godex website, download the latest driver for your model, and follow the installation instructions.